
APPROVAL PROXY
- By designating a proxy for a specific form, you are granting the employee the full right and ability to act upon your behalf in authorizing only the selected form.
- By selecting a proxy for the entire U-Approve System, you are granting the designated employee the full right and ability to act upon your behalf in authorizing all forms
- By activating the "COPY ME" option for a form, you will receive a copy of the email notification, for viewing purposes, but no further action is required.
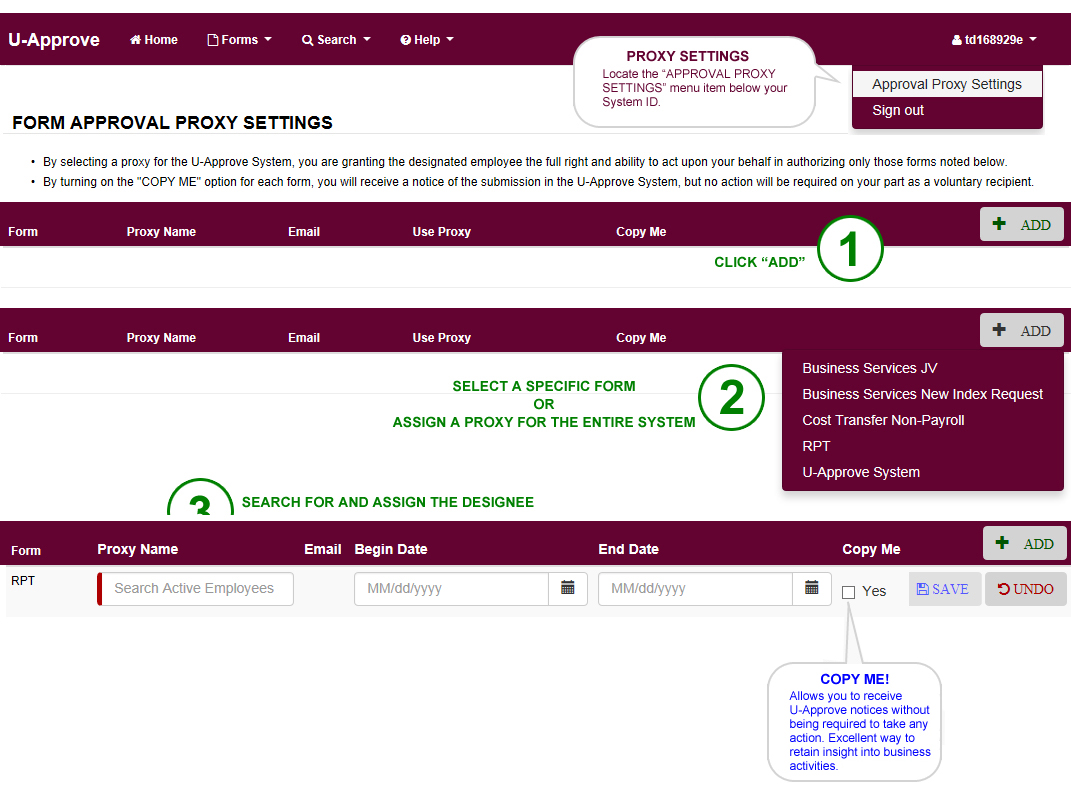
Adding A Proxy:
Locate the “APPROVAL PROXY SETTINGS” menu item below your System ID. Then complete the following:
- Click "ADD"
- Select a specific form or assign a proxy for entire U-Approve System.
- Search for and assign a designee.
Proxy Approvals:
- All designated proxies will receive e-mails, and the approval will appear on the Proxy’s dashboard in the “Awaiting My Approval” category.
- If a user has a U-Approve System Proxy and a Form-Specific proxy, the Form Proxy will receive the approval when you are designated as an approver on the corresponding form.
Date Settings - applies to both form-specific and system-wide use:
- If there is no "begin date" and no "end date" indicated on the setting for the identified proxy, then the approval proxy is simply active indefinitely.
- If a "begin date" is entered and no "end date" is entered, then the approval proxy is active starting on the begin date.
- If an "end date" is entered and no "begin date" is indicated, then the approval proxy will be active until the end date.
- If the "begin date" and the "end date" are entered, then the approval proxy is active on the begin date and will terminate upon the end date.
Editing Proxies:
- To add a proxy: Click “ADD” and choose from the menu options. Enter the data in the appropriate field or check box. To finalize, click “SAVE”.
- To change a proxy: Click “Edit” next to the specific line, then make the changes in the appropriate field or check box. To finalize, click “SAVE”.
- To remove a proxy: Click “DELETE” next to the specific line.
FORWARDING
- Search for and designate the individual who will receive the forwarded notification.
- Confirm this is the appropriate recipient and click send.

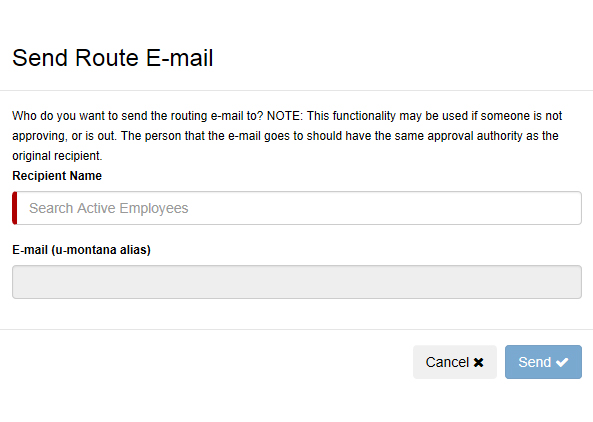
Forwarding Tips:
- To forward an e-mail, go to the “Pending Other’s Approval” category on the home page, select the desired form and click the forward button. Then complete the forwarding steps outlined above in order to re-route the form to a new recipient for approval.
- If necessary, users may forward an email to themselves. By setting the form to “Not Approved” the initiating user can then make edit the submission.