
Step-By-Step Walkthrough
- Access the UM Terra Dotta portal.
- Sign in via the “Non-UM Login/Register” button in the top right corner of the page. For help, visit the Technical Support page.
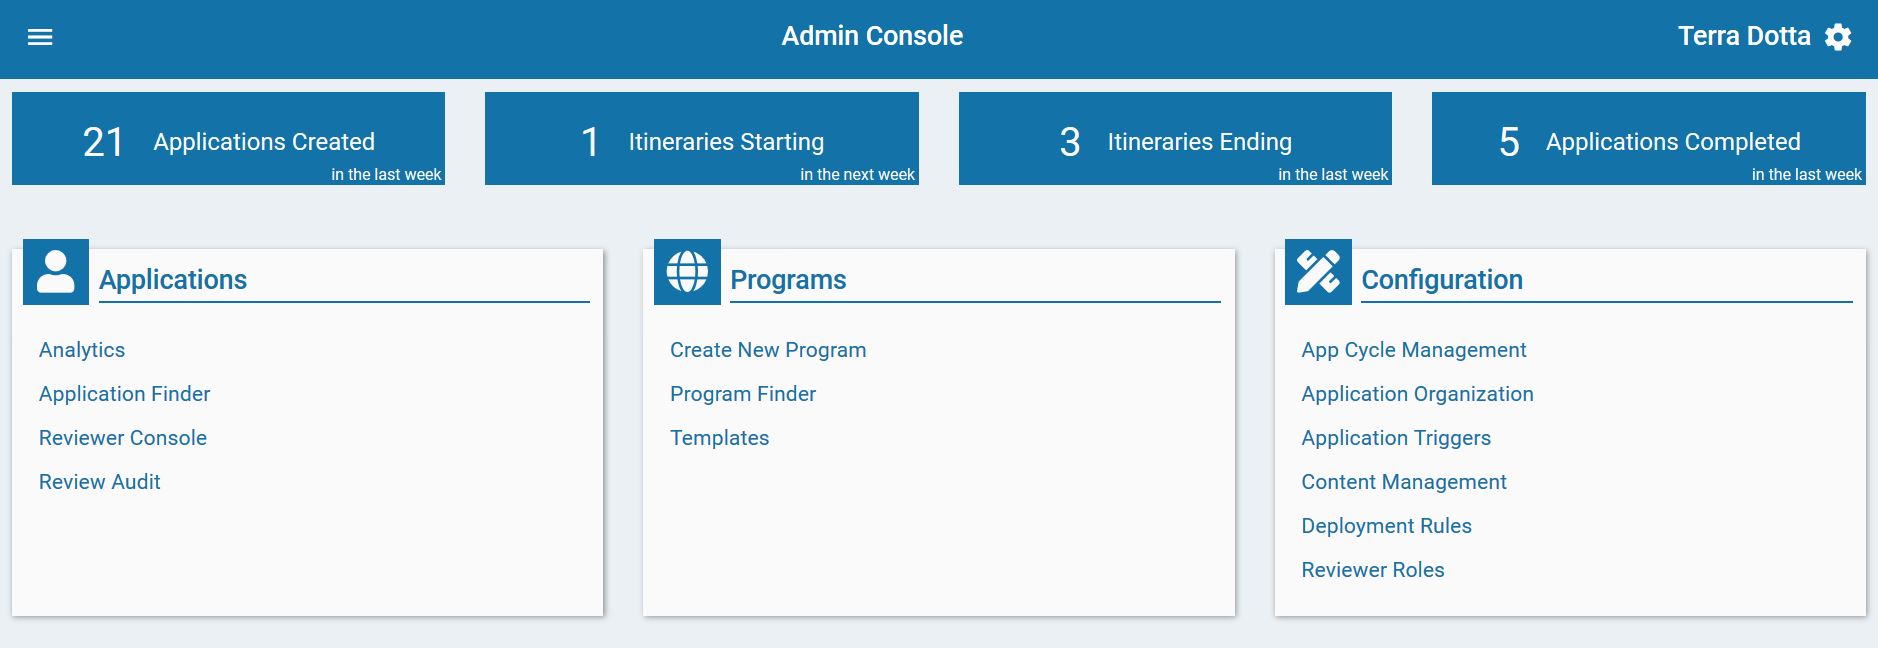
- To access Applications from the Administration: Home, click on the maroon “Admin Console” button near the top of the webpage and below the black menu strip. If you landed directly at the Admin Console upon login, the maroon menu bar will say “Admin Console” and there will be no black menu strip at the top of the page.

- The above photo is how to access the Admin Console via the Administrative homepage.
- The photo below is what the Admin Console landing page will look similar to.
- Once in the Admin Console, click on “Application Finder” in the far-left column on the screen.
- Click on “My Applications Only” and each application relevant to your program will display. If they do not appear, please follow steps 7-10
- Once in Application Finder, click on the “Filter results” icon as shown below. Hint: this icon is a small funnel-shaped icon just to the right of the Search bar:

- The easiest way to find your applicants will be to leave the default drop-down sections blank, and instead search for your exact program by name. To do so, select the filter icon, click on the maroon “+” icon in the filter search pop-up, hover over “Program Details”, and select “Programs” as shown below:
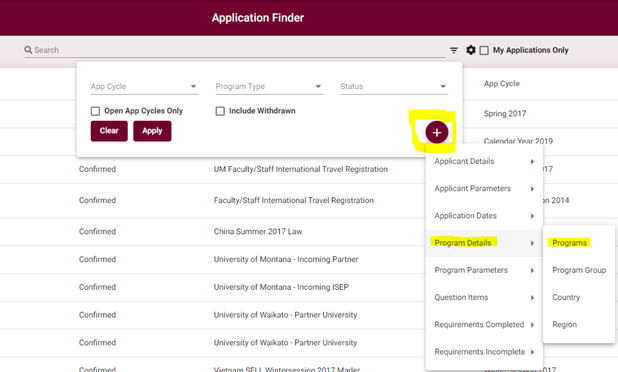
- A toolbar under the previous three parameters should display. Next type in your program name (or first few letters), and select your program once it appears in the dropdown menu. Hint: upon selecting your program name, you might need to click anywhere within the white space in order for the other program options to disappear and for your program name to be applied.
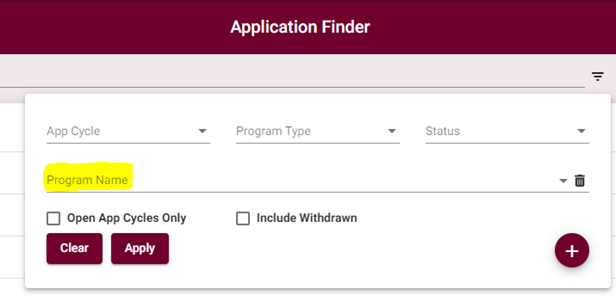 Once your program name has appropriately been assigned (the program name will appear within a grey cylinder below the “Program Name” search bar), you’re ready to hit “Apply”. Note: if this is a reoccurring program, you might choose to select the checkbox for “Open App Cycles Only” before hitting “Apply,” meaning you will not make applications appear from past years. The applications in need of review and/or already reviewed will display (consider this your Class Roster or list of prospective participants).
- By default, the Education Abroad Office has created the “Status” of an application (the second column from the left-hand-side, next to the applicant’s name) to appear as “Pending” if the student is still working on the application and “Ready for Review” if the application has been submitted.
- To access an application and review the Application Contents, click on the “Access Full Application” button to the far right of the applicant's row:

- Once in the individual application, you can view the contents of:
- The application and what the student has submitted, under “Requirements”
- A student’s personal information, under “Profile”
- The student’s activity on the application software, emails they’ve been sent through the application software, or any notes or reviews you’ve created about the application while reviewing, under “Activity and Notes”. Important Note: any comments or reviews you create will be internal only, so the applicant will not see the comments or suggested action (approve, decline, waitlist) that you write here (using the “+” icon in the lower right-hand corner).
- Any documents that you the reviewer has uploaded into the student’s application for safe-keeping (like a receipt), under “Documents”.
- When a student is starting a new application, they’re automatically in the “pre-decision” application phase. From this one page, you as the reviewer, though, can also view the “Pre-Decision”, “Post-Decision”, “Abroad”, and “Returnee” application contents to make sure all of the application’s components are correctly appearing underneath the appropriate timelines, if relevant to your application.
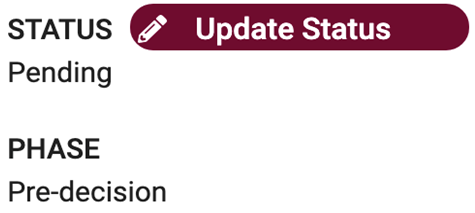
- If you’ve reviewed an application that you’re ready to approve, you should then change the status of the application, which will likely say “Ready for Review”. To change the status of the application, next to the applicant’s photo (or the generic body silhouette), click the maroon “Change Application Status” button displayed as a pencil icon:
- You’ll notice that there are many options to choose from, so please consult with the Education Abroad team if you need help. Otherwise, your three options will most likely be: “Accepted,” “Rejected,” or “Waitlist”
- You’ll notice that there are many options to choose from, so please consult with the Education Abroad team if you need help. Otherwise, your three options will most likely be: “Accepted,” “Rejected,” or “Waitlist”
- Once you select your preferred status, you will not need to click within the white space in order to cement your selection.
- To save the new status, click “Update”. If you’d like to student to be notified at the same time, check the box “Send email notification” before selecting “Update”. You will be able to see the email that the student will receive under the applications “Activity and Notes” tab.
- If your application has post-decision items, the student will then have access to these upon receiving “Accepted” status during the pre-decision phase. You will then follow the steps above to review the post-decision material submissions.
- When you’re ready to return to the other applications that appeared from your search, simply select the back button in the upper-right-hand corner below your name:

- Abroad and Returnee phases are initiated based off of your program’s itinerary in the application software. Your “Accepted” student will automatically have access to “Abroad” materials once their itinerary begins. Similarly, an “Accepted” applicant will have automatic access to any “Returnee” materials (such as a program evaluation) once the program’s itinerary comes to an end.
If you'd like to create an Excel spreadsheet of important applicant information from the application, you can select the checkbox next to an applicant's name (or multiple checkboxes next to multiple applicants' names) and select the Export to Excel icon in the upper right hand corner:

Please contact the Education Abroad team for any assistance: GoAbroad@mso.umt.edu or call (406)243-2278