
Images
To insert an image into a row, you will use the WYSIWYG editor. Select Insert > Image. You can also just click on the image icon in the toolbar below the menu bar.

General Tab
- In the Insert/edit image window that pops up, Choose whether you want to link to an internal image (one that you have uploaded to Cascade) or an external image. If you want to link to an internal image, navigate to the image in Cascade by clicking in the Image Source field. If you are linking to an external image, paste the URL of that image into the Image Source field.
- If the image is decorative, check the Decorative checkbox.
- If the image is not decorative, fill in a short description of the image in the image description field. Please note this is legally required for accessibility purposes for all images in Cascade.
- Use the Dimensions field to alter the dimensions of the image, though we do recommend altering the dimensions of any image before inserting into Cascade as this will ensure that the image displays at the size and quality you want it to.
- You can set the Class field to pull-left or pull-right if you want to align the image to the left or right of the column.
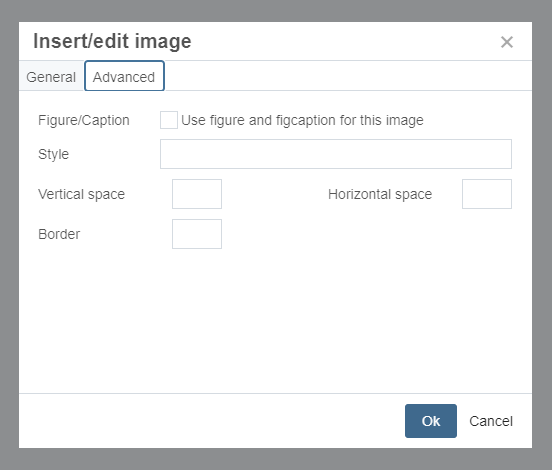
Advanced Tab
- Figure/Caption - select this checkbox to add a blank caption to your image. Fill in the caption after you select OK.
- Style, Vertical space, Horizontal space and the Border options are not currently available.
Image Guidelines
When used properly, images can add value to your website. In general, images should be relevant to and enhance the content of your page. Apply these guidelines to make images on your website accessible and web-friendly.
Upload Images for Internal Use
Although Cascade offers an external option for images, we recommend you upload an image to use internally. External images exist outside of your website and can be altered or deleted without notice, which can create unexpected changes to your website.
Image Size Recommendations
All images uploaded into Cascade should have a resolution of 72ppi and should not exceed a width of 1200 px. For an image that spans an entire row, we recommend the image be much wider than higher, ideally with a width to height ratio of roughly 4:1 or 3:1. This is a very general recommendation, and context will be the primary determining factor in the size and aspect ratio of your images.
- Full Width - 1200 pixels wide.
- Two column page - 600 pixels wide.
- Three column page - 400 pixels wide.
- Four column page - 300 pixels wide.
Resizing Images
If You don't have Photoshop we recommend using pixlr.com which is free image editing software, attached below are directions for resizing an image in Pixlr.
Resize images in Pixlr:
- Login to pixlr.com or create an account.
- From here you should be looking at your user dashboard, select open image, load url or drag and drop an image into the dashboard to get started.
- Once your Image has been uploaded click on it to edit the image.
- Once the image has been selected you will be taken to an editing page. The toolbar on the left hand side of the screen will allow you to make changes and manipulate your images in a variety of ways.
- Click on the Properties panel at the top of the toolbar to resize your image.
- Click on resize image.
- Make sure that “Constrain Proportions” are selected to maintain the proportion of your image.
- Enter the new size you want your image to be.
- Click apply.
- Now click the “Save” button in the lower right hand corner and the “Download” button on the following screen.
- Your image should download to your “Downloads” folder on your computer.
- You have now successfully resized an image in Pixlr.
Add Meaningful Alt Text to Images
Alternative text (alt text) is used to convey the subject matter of images used on your site. Alt text helps to ensure your website is accessible to people with visual impairments who might be using a screen reader. All images on your site must contain alt text.
When adding an image to a page the alt text field is called the image description. Alt text should meaningfully describe the content of the image as succinctly as possible without unnecessary details.
Bad Alt Text
monte-image
Good Alt Text
Monte the Bear
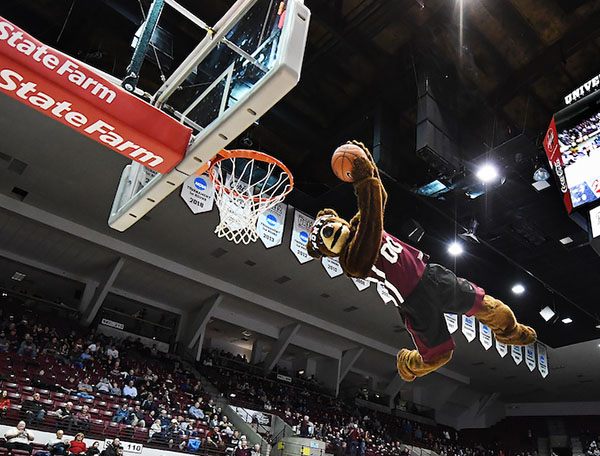
Better Alt Text
Monte the mascot acrobatically dunking a basketball
Read about the new AI options for image alt-text on our AI Content page.
Avoid Using Images with Overlaid Flattened Text
Text flattened onto an image (text that is part of the image file) causes a potential accessibility issue. Screen readers cannot read that text, so a user who is using that technology to view your site will not be able to read that text. You can add alt text to the image which includes all the text that is flattened onto the image. But a best practice is to avoid that and find an alternative location for that text, such as one of the Blocks available in Cascade.
As a best practice, all text on your site should be 'live.' That is, it should be in a paragraph, heading, text field that is part of a block, etc.
Site Banners
Why the move to Marketing?
We are now relying on the Marketing department to provide site banners. We do this for a few reasons:
- These banner photos need to be sized properly for desktop and mobile
- The photo selection has accessibility implications
- Marketing is most familiar with how photo choices work with the UM Brand and will make choices that reflect the brand in a consistent way.
You'll be working with Jennifer Sauer or CeeJay Brown to select a banner image for your site. You can find a photo that is representative of your site, services and people using the University's photo library. Once you have selected a photo, email CeeJay Brown or Jennifer Sauer to have your banner created or changed.